Tools
Glue (Clear Drying)
Plastic Lid (for glue)
Quilling Shapes and Scrolls Guide (You can see how to make one Here.)
Quilling Slotted Tool or a Nail (You can see how to make one Here.)
Ruler
Scissors
Straight Pins
Toothpicks (for applying glue)
Tweezers
Wax Paper Covered Cardboard
Materials
Paper Strips
Pattern
Plastic Wrap
Instructions
Pick a pattern. Black and white clip art or coloring books are a nice place to find free patterns.
Cut the pattern to fit on the wax paper covered cardboard.
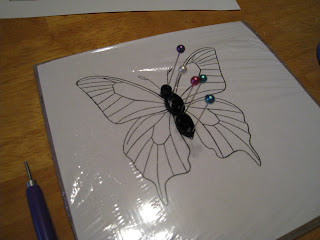
Place the pattern on the wax covered cardboard and cover the pattern with a piece of plastic wrap.
Use the Quilling Shapes and Scrolls guide to determine the shape you will need to complete your design.
As an example, I am making a butterfly. I am starting on the body of the butterfly. I need a tight circle for the head, a marquise and a tear drop to make the body.
Make your shapes and use the toothpick to apply glue to the end of the roll.
Place your first shape on the pattern and hold in place with a straight pin.
Use the tweezers to help place your shapes.
Make the third shape. I made a tear drop. Place a small dot of glue where the shapes join and hold in place with straight pins.
Continue making your shapes. Glue and pin them into place, using the pattern as your guide.
Allow the glue to dry and remove the straight pins.
Gently remove your design from the plastic wrap.
You can hang your design with fishing line or glue to a note card.


No comments:
Post a Comment